Showing posts with label Seasonal: Winter. Show all posts

Monday, September 29, 2014

Potato Soup

Too much month at the end of the money? LOTS of potatoes and turnips lying around from a CSA box or your garden? Or simply lingering because they last so long, you can afford to save them for the end of the grocery week?

I used up lots of my Colvin CSA potatoes and turnips in this simple, delicious soup. It's a basic potato soup that is kid-friendly, makes a lot, and is fairly inexpensive. There is time spent on the front end peeling and chopping and braising, but after that, it's fairly straightforward. It reheats fine, too.


Potato Soup
~based on techniques from Vegetarian Cooking for Everyone, Simply in Season, and Joy of Cooking


  • 2 pounds potatoes
  • 1-1 1/4 pounds young white turnips
  • 2 cups chopped onion
  • 1 quart chicken stock
  • 6 T. butter
  • 3 bay leaves
  • salt and pepper
  • 2 cups milk
  • garnishes: bacon bits, chopped fresh parsley, shredded cheese
  1. Start onions slow cooking over medium heat in 2-3 tablespoons butter.
  2. Peel and roughly chop potatoes and turnips. Blanch turnips in boiling water for 6 minutes. Drain.
  3. Add chopped potatoes and bay leaves to cooking onions and stir/cook for about 10 minutes, until potatoes are starting to brown and soften slightly.
  4. Meanwhile, melt remaining butter in large skillet. Add turnips and 1 cup chicken stock. Bring to a boil, reduce heat, and simmer (covered) until turnips are tender, 10-12 minutes. Note: entire turnips recipe can be made ahead of time and just added in when the puree step comes.
  5. When potatoes have browned slightly, add 1 cup chicken stock to the pot and deglaze, scraping up any browned bits on the bottom. Cook and stir for a few minutes. Add remaining 2 cups chicken stock plus enough water to cover potatoes. Bring to a boil, reduce heat, and simmer, covered, until potatoes are tender.
  6. Combine turnips (and juice) with 1/2-2/3 of the potatoes (and some juice) in a food processor. Pulse until mostly pureed but still slightly chunky. Add back to pot with remaining potatoes and stir in milk. Reheat and season to taste with salt and pepper.
~Serves 8

Wednesday, September 10, 2014

Butternut Squash Soup with Roasted Apple

We are partial to our favorite Butternut Squash Soup, but since I was able to get regional apples and fresh local apple cider in addition to more butternut squash from the Colvins, I figured I try this new recipe. It's a sweeter soup than our favorite and not as substantial (no dairy or anything to offer some staying power). It freezes fine, too.


Butternut Squash Soup with Roasted Apple
~from The B. T. C. Old-Fashioned Grocery Cookbook


  • 2 pounds mixed apples, peeled, halved, and cored*
  • 2 T. olive oil, plus more for the apples
  • salt
  • 1/4 t. pepper, plus more for the apples
  • 1/2 c. butter
  • 6 pounds butternut squash, peeled, seeded, and chopped
  • 1 large yellow onion, chopped
  • 1 garlic clove, chopped
  • 8 cups chicken or vegetable stock (or part stock/part water)
  • 2 c. fresh apple cider
  • 2 T. apple cider vinegar
  • 2 T. apple butter
  • 1 cinnamon stick or ~ 1/4 t. ground cinnamon
  • 1/8 t. allspice
  • 1/8 t. ground fennel
  • 1/8 t. nutmeg
  • dash cloves
  • sprigs fresh thyme
*cookbook specified granny smith, but I used a mixture of local apples

  1. Toss apples in enough oil to coat, season with salt and pepper, and roast at 425 degrees (cut-side down) for 30 to 45 minutes, until caramelized. 
  2. Heat butter and oil in a stockpot over medium heat. Add squash and onion and cook, stirring, until squash is soft, about 15 minutes. Add garlic and cook another 5 minutes. Add remaining ingredients (except thyme). Bring to a boil, reduce heat, and simmer for about an hour.
  3. Remove pot from heat, remove cinnamon stick if using, and puree. 
  4. Sprinkle individual servings with thyme, if using.
~Serves 6-9

Thursday, September 4, 2014

Braised Lentils with Roasted Butternut Squash

True story: for the first time in 4 years, I forgot to pick up my CSA veggies. Well, I remembered, but by then, I couldn't make it work. I guess Labor Day threw off my mental "what day is it today" track. The Colvins are very forgiving types, thank goodness. I think we're going to be able to work it out for me to get a box this weekend. So, I don't know if you will be getting butternut squash this weekend or not, but if you're like me, you may still have one or two lying around. I usually eat up the more perishable stuff first. Good thing because last night, I could still whip up a meal with CSA veggies!


This recipe is simple, but takes a bit of time to cook. It's delicious, too, despite the unassuming ingredient list. I'm not a huge fan of chunks of butternut squash; generally, I prefer the pureed recipes like our favorite Butternut Squash Soup. But the combination in this recipe works beautifully. I didn't think to take a picture of all the Colvin veggies that went into this recipe, but I used onions and garlic from them in addition to the squash! This works as a good side dish for sausage (smoked, flavored chicken, etc.) as well as a vegan/vegetarian main dish.


Braised Lentils with Roasted Butternut Squash
~adapted slightly from How to Cook Everything, 10th ann. edition


  • 1 cup lentils, brown or green
  • 1 small onion or 1/2 of a large one
  • 2 cloves garlic
  • 2 c. peeled, cubed butternut squash (1/2-inch to 1-inch cubes) from a medium squash
  • 2 T. olive oil plus extra
  • 2 c. chicken or vegetable stock
  • 1/2 c. red wine (can use white for a more subtle taste)
  • 1 bay leaf
  • salt and pepper to taste
  1. Toss squash cubes with enough oil to coat and roast at 375 degrees until tender and caramelized (about 20 minutes or so). (I sprinkled some salt and pepper over the cubes as well.)
  2. Meanwhile, in a medium pot, sauté onion over medium high heat until translucent. Add garlic and stir for a minute or so until garlic is fragrant. 
  3. Add lentils, stock, wine, and bay leaf to pot. Bring to a boil. Reduce heat, partially cover, and simmer for about 25 minutes.
  4. Taste, adjust seasonings, and simmer until lentils are done to your liking. Removing the lid will help some of the excess liquid cook off (which I like). When lentils are just about done, gently stir in squash pieces to reheat.
~Serves 4-6

Monday, July 7, 2014

Kitchen Sink Recipes

Every chef needs a few "back pocket" recipes he or she can whip out and produce at the last minute. The ones you keep pantry supplies on hand for or the recipes you could make in your sleep (even if it's just boxed noodles and jarred pasta sauce.)

The CSA shareholder and the gardener need "Kitchen Sink" Recipes, too: recipes where you can put everything in but the kitchen sink, vegetable-wise. Val Colvin, the Farmer's Wife, gave a nod to my pizza-making in this vein, and I thought I'd share some of my favorite Kitchen Sink Recipes here. This is my go to list of meal ideas for my CSA basket. While I post one-two recipes each week that are a little "fancier" or more exotic as ideas for folks to use when contemplating their weekly harvest/haul, the ones below are far more regular features for us:

Stir-Fry: always an option with rice or noodles, with or without meat. Basic preparation tips: chop/slice veggies in similar sizes for even cooking. Start longer cooking veggies first (onions, cabbage, broccoli, roots in general (carrots, kohlrabi, etc)). Then do medium cooking veggies (peppers, beans, etc.). End with shortest cooking times (summer squash, peas, etc.). I usually use my Basic Stir Fry as a base and just change up sauces as I feel like it (BiBimBap is a nice variation, and Trader Joe's makes a great Teriyaki sauce--Soyaki--for when I'm in a hurry)

Pizza: YES! We put anything and everything on a pizza crust, with or without tomato sauce. Longer cooking veggies benefit from blanching first (potatoes, etc.) unless they're sliced VERY thin. Super short-cooking veggies benefit from pre-baking the crust slightly (i.e. lettuces). Check out the pizza category in the side bar for some possibilities.

Roasted Veggies: I eat these for any meal of the day. Yum yum yum. As with stir-fries, make sure everything is cut in similar sized pieces. Toss with olive oil and salt and pepper.  Roast for 15-30 minutes or until veggies are done to your liking. Stir every 5-10. If you have a mixture of short and long cooking times, just start the longer ones first and add in the shorter ones halfway through. We roast at 400-425 degrees usually, but it's very flexible--if I have something else in the oven, I'll adjust the temperature accordingly. Favorites for this: potatoes, sweet potatoes, turnips, kohlrabi, onions, peppers, broccoli florets (add in halfway through), carrots, tomatoes (keep separate if you don't want their juice over everything else), summer squash, green beans, …. Leftovers can be topped with a fried egg for breakfast, folded into a wrap or used in a salad for lunch, or simply reheated and enjoyed anytime of the day. Grilled veggies are a similar option.

Wraps/Quesadillas: Saute some sliced bell peppers, onions, summer squash and throw 'em in your next tortilla. Use leftover roasted veggies, cooked greens, you name it--it can all go in a wrap or quesadilla or burrito.

Veggie Sandwiches: Anything that can be eaten raw goes into these. Sliced or shredded: carrots, bell peppers, kohlrabi, radishes, lettuces, greens, tomatoes, broccoli, summer squash, onions, ….

Salad: (duh) There's more than meets the eye here. Of course, we think of lettuce salads topped with the usual suspects: tomatoes and cucumbers. But don't forget that the Mediterranean, for instance, often eats a salad of tomatoes, bell peppers and cucumbers sans lettuce. And slaw is just cabbage salad. Other root veggies (kohlrabi and turnips, for example) can be shredded and used for slaw just like cabbage. Kale is delicious in a salad. In the Mediterranean, cooked greens are eaten cold with a drizzle of oil and vinegar as a salad. I often just eat a tomato or cucumber sliced with salt and pepper.

Quiche: We've camouflaged put lots of things in a cheesy, custardy egg base…. summer squash, greens, and nearly anything else (we've not tried root vegetables this way).

Ethnic: If you're trying to disguise the taste/texture of a vegetable you're learning to like, strong ethnic flavors can go a long way. We're curry fans, and curry dishes have helped us learn to like mustard greens, cauliflower, and turnips in particular. Salsa camouflages the blander tastes of summer squash, milder cooked greens, and the like--you can sneak them into burritos and enchiladas easily. Lasagna or manicotti is a good vehicle for cooked veggies, too. And, of course, stir fries full of familiar veggies can help hide one or two surprises.

Saturday, September 7, 2013

Easy Roasted Veggies

I don't know what it is about roasting, but vegetables come out of that oven a totally different breed than by any other cooking method. We've yet to find a vegetable (save, perhaps, for lettuce and spinach and the like) that can't be roasted successfully. Mixtures are nice, but so are single vegetable dishes. A couple of weeks ago, we had a lovely assortment of veggies from the Colvins that practically begged to be roasted: fennel, summer squash, tomatoes bell peppers (see the picture below)--I tossed the whole mixture with a balsamic vinaigrette that had fresh basil (also from the Colvins) in it, but the simple method listed below works a base no matter what else you plan to do with them. This week, we got more summer squash and some bell peppers in our CSA box, and I added a carrot, sweet potato, and a couple of white potatoes into the mix. Mmmmm


What can you do with roasted vegetables, besides use them as a side dish? Top a pre-baked pizza crust with them, add a little cheese, and pop back in the oven briefly. Toss them, cold, with some greens and salad dressings. Add them to a wrap. Mix them with some rice and add some extra seasoning/salsa/salad dressing. You get the picture. Possibilities are nearly endless.


Easy Roasted Veggies--basic method

Assortment of prepared vegetables*
Olive oil
salt and pepper or other seasoning blend (we've used Herbes de Provence, Cajun seasoning, Adobo/Fajita seasoning, Paula Deen's House Seasoning, ....)

Alternately, you can just use a vinaigrette--homemade or storebought--instead of the oil and seasonings.


Toss prepared vegetables with oil and seasonings. Spread out on a jelly roll pan; you may need two pans if you roast a lot of vegetables at once. They don't need to be in a single layer, but you also don't want them piled too high. If you're roasting tomatoes, keep them separate from the big mixture and roast them at the end of the pan in their own area. They will release lots of juice--which is delicious--but you might not want the whole mixture to taste like tomatoes.

Roast at 400-450 degrees until tender. Vague, huh? That's because the temperature and time are both flexible (do you want them done sooner? use a higher temperature and chop them smaller. Have a roast in the oven at 400 degrees? Use that temperature and go with it.). Roasted vegetables don't have to be piping hot to be enjoyed. As long as the harder vegetables (potatoes, carrots) are in small bite-size chunks, you're looking at about 20-30 minutes. Stir every 5-10 minutes, depending on oven temperature and size of vegetable chunks.

*Vegetable Preparation:

Peel vegetables like sweet potatoes, winter squash, and any other vegetable you might normally peel before eating (except for garlic). Cut all veggies into appropriate sized pieces, remembering that vegetables like summer squash and tomatoes will cook faster than vegetables like sweet potatoes. If you're roasting a mixture, cut up harder vegetables into smaller pieces (you'll notice that my sweet potatoes in the picture above are cut fairly thin). For vegetables like green beans, you may want to blanch them first.

Saturday, August 31, 2013

Baked Acorn Squash with Apple-Pear Stuffing

Acorn squash can sometimes be bland, and its texture is not as creamy as butternut. But it makes a terrific vehicle for this apple-pear stuffing and is perfect for fall. We got some acorn squash this week from the Colvins, and this is what we did with it. If you just want to bake or roast a winter squash, follow the same procedure minus the stuffing directions (you can also raise the temperature and bake it for less time; winter squash are very forgiving). We found that this reheated well, too--the flavors were even better on day two!

Baked Acorn Squash with Apple-Pear Stuffing
~Joy of Cooking, 1997 edition

  • 2 medium acorn squash, halved and seeded
  • 2 large apples, peeled, cored, and diced
  • 1 ripe pear, peeled, cored, and diced
  • 1/4 c. raisins
  • 2 T. brown sugar
  • grated zest of 1 small orange
  • 1/4 t. cinnamon
  • 1/8 t. nutmeg
  • 2 T. butter
  • 1/4 c. apple cider or orange juice (use the juice from the orange you zested)
  1. Preheat oven to 325 degrees. Place squash, cut-sides down, in a baking dish and fill the bottom with 1/4-1/2 inch of water. Bake squash for 45 minutes.
  2. Mix apples, pear, raisins, brown sugar, zest, and spices in a medium bowl.
  3. Heat butter in a large skillet over medium heat. Add the fruit mixture and cook until the fruit browns slightly--about 5 minutes. Stir in juice and cook for another 8-10 minutes, or until fruit is tender (but not falling apart). 
  4. When squash have baked for about 45 minutes, remove from oven and pour off water from pan. Place squash cut-side up and fill cavities with fruit mixture, mounding it up a little if necessary. Bake for another 15-20 minutes or until squash is tender.

 ~4-6 servings, depending on how big your squashes are


Saturday, June 22, 2013

CSA Week 4 (6/22/13) + a Refresh-Your-Kale Tip

The kids and I were out of town this week, so we picked up our veggies this morning (Saturday) in downtown Knoxville at the Market Square farmer's market instead of our usual New Harvest Thursday pick-up. So, we got to see Isaac and Noah instead of Caleb (and this post is a few days later than usual!). I got a great picture of Isaac holding out our box and our boys peering in.


Our "haul" this week shows the changing seasons! We're full into summer weather-wise, so we're starting to see true summer produce. Here's what we got:

  • 1 bunch green onions (they're still fairly good-sized onions)
  • 2 stalks green garlic
  • 2 bunches kale--it's the pretty stuff! (the kind with purple ribs--notice that it's kind of wilty over there in the left of the frame? more on that in a minute)
  • 1 bunch small white turnips with greens
  • 1 bunch radishes with greens
  • 3 cucumbers!! (kids are VERY excited about these)
  • 1 round yellow squash (is that a 1-ball?)
  • 2 round zucchini squash (8-balls)**
  • lots of small yellow summer squash
  • 2 nice heads lettuce
**these are freebies Isaac threw in--thanks, Isaac! I mentioned a particular kind of pizza I was planning to make, and that's all he needed to hear. I have TWO pizza recipes for you in the coming days :-).

Whew! And, we have some lettuce and bok choy left over from last week (even though I took it with me on our trip--we ate up a lot, but didn't get it all eaten). Since we will do our usual pick up on Thursday, we don't have tons of time to gobble this bounty up. But I have a plan, so stay tuned.

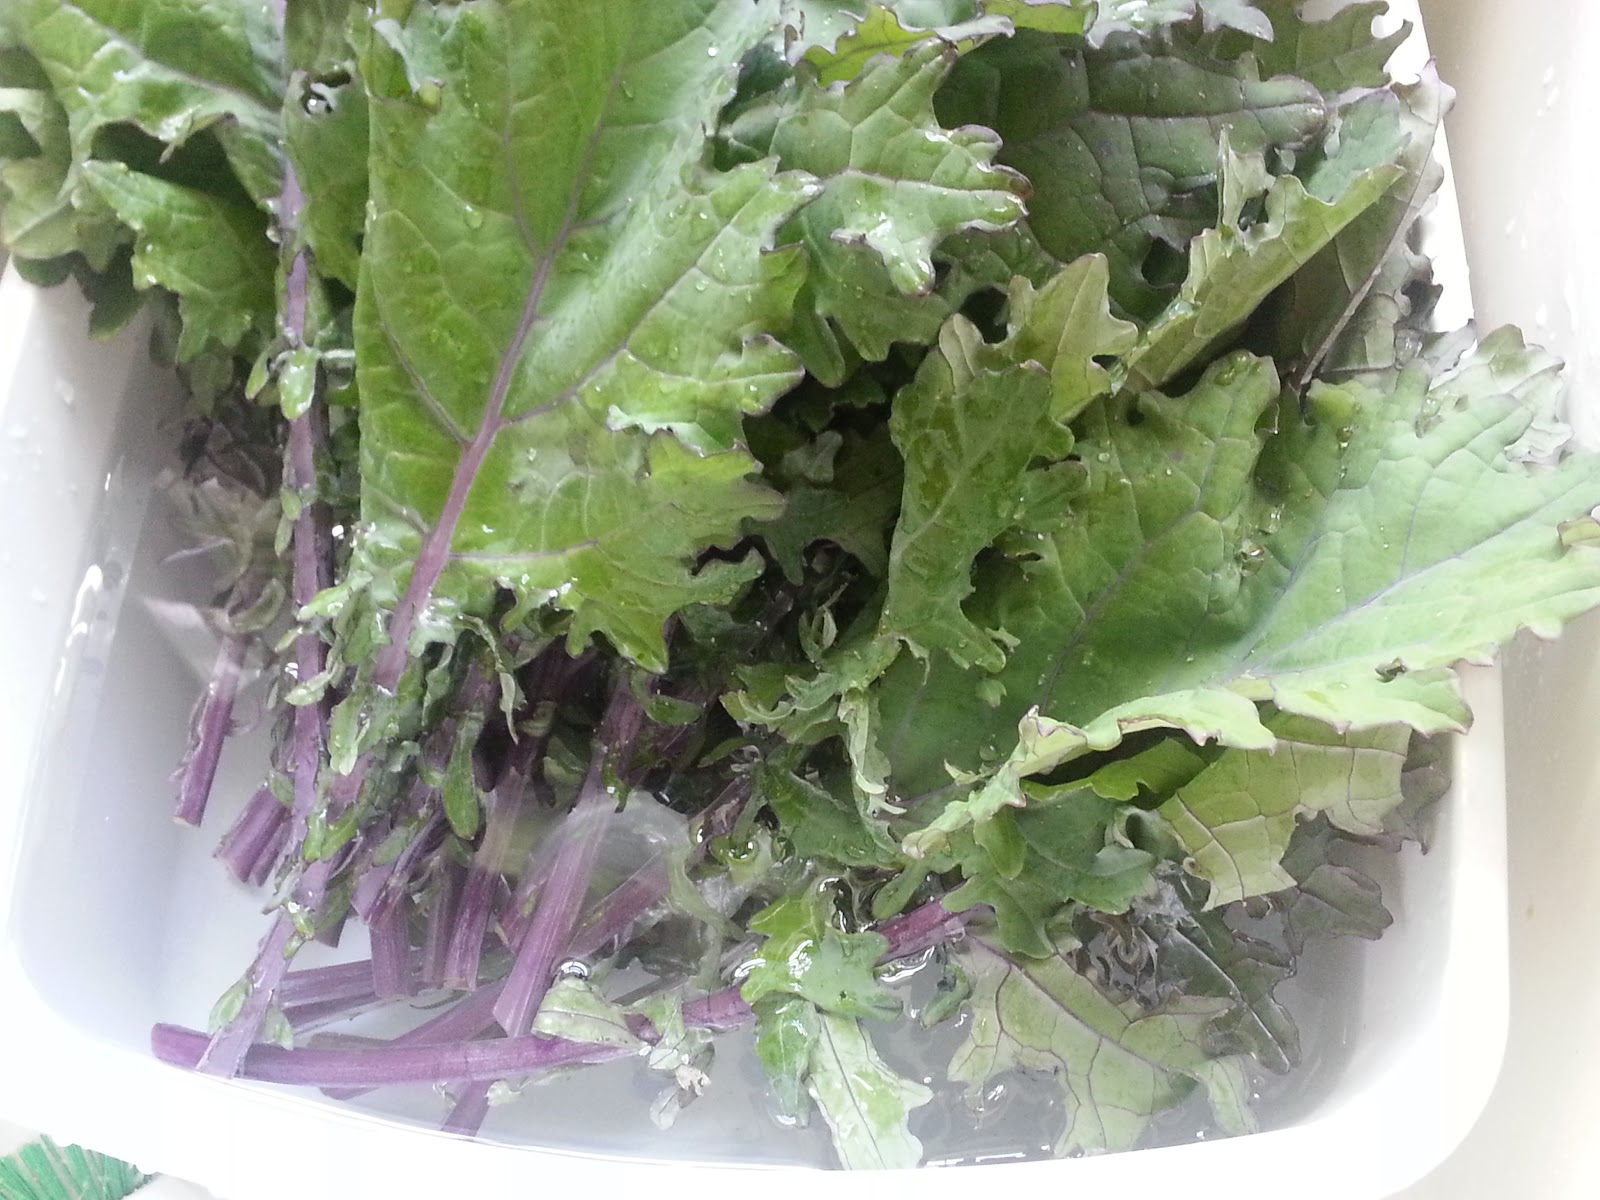
In the meantime, here's a refresh-your-wilty-kale tip (we ran an errand after getting our veggies, so the box got to sit in the hot car...). I *wish* I'd taken a before picture, but you'll have to make do with the after picture alone:


Simply submerge the kale in a tub of cool water and then--very important here--cut off the bottom 1-inch or so of stems under water and keep those stems submerged. The leaves will start to perk up and poke up out of the water but keep the stems under water until you're ready to transport the whole mess into whatever container you use for the fridge. Like new! Notice how those leaves in the picture are coming up out of the water? When I first put them all in, the leaves just sort of drooped under the surface of the water. I did not do anything to "prop" them up!

Consider that your free tip of the week! Do you have any tips for me?


Monday, June 3, 2013

Beans and Greens

It's a classic combination with seemingly infinite pairings. Here, I used my CSA kale from the Colvins with some dried Great Northern beans. I also threw in the radish tops I had since I didn't have quite enough kale (we made Garlic and Greens Pizza already with some of latest batch of kale). I think mustard greens would be good with chick peas (and maybe some curry powder thrown in!). Use your imagination and let me know in the comments!

Beans and Greens
~How to Cook Everything, 10th ann edition

  • 8 oz. dried white beans or chickpeas or other white bean, washed, picked over, and soaked if you have time
  • 1 medium onion, unpeeled (but cut off any dirty stem ends)
  • 1 bay leaf
  • 1 whole clove (optional)
  • salt and pepper
  • 1 bunch (about 1 1/2 pounds) fresh greens: broccoli raab, romaines, cabbage, mustard or turnip greens, kale  or collards, spinach, bok choy, arugula...
  • 1 T. minced garlic, or more to taste
  • 2 T. olive oil, or more to taste
  • 1/2 c. shredded Parmesan and/or crispy bread crumbs (like chunky homemade ones fried in a little bit of butter...)
  1. Put beans in a large pot with enough water to cover. Bring to a boil over high heat. Cut a slit in the onion and put the bay leaf and clove in. Put onion in pot. Adjust heat so mixture bubbles gently; cover partially and cook, stirring occasionally.
  2. Prep greens: wash well. Cut off any stems bigger than 1/8-inch. Chop coarsely.
  3. When beans begin to soften (anywhere from 30 minutes to 1 hour, depending on bean and whether or not they were soaked), sprinkle with salt and pepper. Continue to cook, stirring occasionally and adding water if necessary, until beans are tender but still intact (about the same amount of time as it took for them to soften).
  4. Add greens and cook 'til they are tender, 10-30 minutes (lettuce and spinach won't take long at all; kale and collards will take a while... factor this in for your beans--they'll get pretty mushy if you add kale to them when they're already quite soft).
  5. Remove onion. Taste and adjust seasonings. About 3 minutes before serving stir in garlic and olive oil. Spoon beans and greens into individual bowls and garnish with cheese and/or bread crumbs.

Serves 4

Tuesday, May 14, 2013

Beans and Greens Soup

Spring is unseasonably cool this year, so you may still be willing to eat soup in the middle of May! My friend Bridgette recommended this recipe to me. She notes that you can puree the entire soup at the end for those who find the texture of beans/greens offensive or if you're serving soup to a very young child who might need a smoother consistency. I'd say cornbread would make an idea accompaniment to this!

Beans and Greens Soup
~from my friend Bridgette; she says this is a "Blendtec" recipe

  • 1 T. olive oil
  • 1 med onion, roughly chopped
  • 1 clove garlic, minced
  • 2 c. water, divided
  • 2 t. veg. broth powder
  • 4 c. kale (6-8 leaves, ribs removed and chopped)
  • 2 cans white beans, rinsed, drained, and divided
  • 1/2 t. crushed red pepper
  • 1/4 t. cumin (or double!)

  1. Saute onion and garlic in oil over med-hi heat (about 5 min.). Add 1 c. chicken broth and kale to pan and cover. Cook until wilted, about 5 min. 
  2. Blend remaining stock, half of beans, red pepper and cumin. Add blended beans and whole beans to pan. Simmer for 5 minutes and serve. 
~Serves 4

Monday, February 18, 2013

Steamed Bok Choy with Dressing

"I don't like bok choy!"

"Where do you GET bok choy?"

My husband and I have come to really enjoy bok choy; this recipe actually won accolades from my boys after they ate their required "no thank you bite." Simple and quick--just my style. Bok choy can be found in many larger supermarkets. The small "baby bok choy" that we used comes from a large-ish Asian/ethnic grocery store in town (their produce is SO cheap!!!).


Steamed Bok Choy with Dressing
~recipe from Anja's Food For Thought (I'm putting here at full tummies b/c I'll forget where I found it and it's definitely a remake!)

  • 1 baby bok choy per person/serving (Dressing ingredients are for 4 bok choy)
  • 2 T. soy sauce
  • 1 T. oil (I used peanut; Anja recommends roasted sesame)
  • 2 garlic cloves, crushed
  • 1/2 t. crushed red pepper flakes
  • 2 green onions, sliced thin
  • sesame seeds
  1. Clean the bok choy thoroughly and slice vertically in half. Place them in a steamer basket and steam for 3-4 minutes (you can overlap them some).
  2. Mix soy sauce, oil, garlic, and red pepper flakes together.
  3. Place cooked bok choy on a platter or in a dish and drizzle dressing over them. Sprinkle with green onions and sesame seeds.

~Serves 4 (1 baby bok choy/person)

Wednesday, June 27, 2012

Green and Gold Salad with Citrus Ranch Dressing

This is a hearty salad my mom makes, and it's a nice change of pace from the usual. It's also pretty and a nutritional powerhouse. I'm posting it now because I need to return the recipe card to my mom, but it's really more of a fall salad or early spring.

Green and Gold Salad with Citrus Ranch Dressing

  • 3 c. chopped fresh broccoli
  • 1 1/2 c. diced mango
  • 1 large navel orange, sectioned (and cut in halves/thirds if you prefer)
  • 1/2 c. toasted pecans
  • 1 (6-oz) package fresh spinach

Toss together. Toss with dressing to taste.

Citrus Ranch Dressing

  • 3/4 c. Ranch dressing
  • 2 t. grated orange rind
  • 3 T. fresh orange juice

Mix together thoroughly.

~Serves 4-6

Tuesday, November 8, 2011

Christmas Wassail

One of the family recipes! (from my husband's side...)This makes A LOT; it also keeps for a few days, so you can make it ahead of time for a big party. It will make your house smell wonderful while it's simmering. Perfect for those holiday gatherings ahead.

  • 2 (46-oz) apple juice
  • 2 (46-oz) pineapple juice
  • 2 c. orange juice
  • 1/2 c. sugar
  • 1 t. whole cloves
  • 1 qt. water
  • 1 c. lemon juice
  • 1 cinnamon stick

Bring water, sugar, and spices to a boil, and boil for a few minutes. Strain. Add juices and refrigerate. That's it!

Heat on the stove in a large stockpot if serving for a party. Otherwise, you can heat it by the cup. Mmm...


Friday, February 5, 2010

Garlic and Greens Pizza


This is very garlicky, but if you like that sort of thing then it's yummy! One of our children liked it; the other two didn't. My husband and I really enjoyed it. You don't taste the kale much at all; the garlic and sun-dried tomatoes really carry the day. A nice change from traditional, tomato-based pizza and a nice way to sneak in some "greens."

**Updated 5/31/13: I made a smallish (12-inch) thin crust pizza this time and found the kale mixture to be just right. I had a scant 4 cups chopped kale before I cooked it down. I also used less cheese. Scroll down to see the recipe plus pictures.

Garlic and Greens Pizza
Recipe from Moosewood Collective Cooks at Home

1 prebaked pizza shell (15-inch size)*
1/3-1/2 c. sun-dried tomatoes (optional--I used)
1/2 c. boiling water, if using dried tomatoes not packed in oil (if using oil-packed, rinse first)
4 large garlic cloves, minced
2-3 T. olive oil
4 packed cups coarsely chopped rinsed and stemmed kale**
1/4 t. salt
1/4 c. chopped fresh basil or 2 T. dried
1 1/2 c. grated mozzarella cheese
1/4 c. grated Pecorino cheese (I used Parmesan)

*If using your own pizza dough, roll out a 15-inch crust and bake slightly--until it starts to be a bit done on top.
**I found this to be about 4 (8-inch) very leafy stems of kale; if you're able to buy just a small amount, you now know how much to buy! I fold my leaves in half and just snip off the stem. Then I chop the leaves.

  1. Preheat the oven to 450 degrees.
  2. If you are using sun-dried tomatoes, place them in a heatproof bowl, cover with the boiling water, and set aside.
  3. In a large skillet, saute the minced garlic in the oil for about a minute over medium-high heat. Add the kale to the skillet along with the salt, and saute on medium-high heat for 5-10 minutes, until just tender (I left mine a touch "crunchy" still and liked it like that--you don't want it mushy and you have to watch/stir to make sure it doesn't burn). The cooking time will vary with the age and freshness of the kale. The kale cooks down--this bowl was nearly full of raw kale, and now it's about a fourth full.
  4. While the kale cooks, drain and chop the sun-dried tomatoes. Add the chopped basil and sun-dried tomatoes to the kale and remove the skillet from the heat. You can let this mixture sit at room temperature for a while--especially if you still need to roll out a pizza crust or want to tidy up before popping the pizza in the oven.
  5. Spread the kale topping on the pizza crust, using a slotted spoon if necessary, and sprinkle the cheeses on top. Bake until cheese is starting to brown slightly on top and crust is done.
Makes 1 15-inch pizza


Friday, December 18, 2009

Chicken (or Turkey) Soup with Lentils and Barley

This is an easy, inexpensive soup to make and perfect for cold weather (and when you've had enough of rich holiday fare!).

From Better Homes and Gardens New Cookbook, 11th edition

  • 1 c. sliced leeks or chopped onion
  • 1/2 c. chopped red or green pepper
  • 1 clove garlic, minced
  • 2 T. butter
  • 2 (14.5-oz.) cans chicken broth (or 3 3/4 cups homemade)
  • 1 1/2 cups water--1/2 c. more if using pearl barley
  • 1/2 c. lentils, rinsed and drained
  • 1/2 t. dried basil
  • 1/4 t. dried oregano
  • 1/4 t. dried rosemary
  • 1 1/2 c. chopped cooked chicken (or turkey)
  • 1 1/2 c. sliced carrots (about 3 medium)
  • 1/2 c. quick-cooking or pearl barley
  • 1 (14.5-oz.) can diced tomatoes, undrained
  1. In a large saucepan, cook leeks/onions, pepper, and garlic in butter until tender. Carefully stir in broth, water, lentils, basil, oregano, rosemary, 1/4 t. pepper, and barley--if using pearl barley. Bring to boiling; reduce heat. Cover and simmer for 20 minutes.
  2. Stir in meat, carrots, and barley, if using quick-cooking, and simmer, covered, for about 20 minutes more or just until carrots are tender. Stir in undrained tomatoes and heat through.
Serves 6 (makes about 8 cups)

Wednesday, December 2, 2009

Kid-Friendly Citrus: Some Tips and Tricks


We try to eat seasonal fruit whenever possible. That means we truly gorge on strawberries during the month of May and eat them rather sparingly the rest of the year. Do we miss them? Not when peach season hits in all its juiciness. Then, the crisp mult-dimensional apple flavors take over. And then the perfect winter complement arrives: citrus! Just like other seasonal fruit, citrus fruit is far better this time of year than other times (and it packs a nice vitamin C punch right when we need it most).

Unfortunately, the poor orange doesn't make its way to a kid's plates as often as other fruits. Who wants to peel a million oranges, pull off any rough strings, then cut them into bite-sized pieces? It takes so darned long. Think again!

Here's a quick primer to citrus types and some strategies for getting them onto your kids' plates more often.

Grapefruit: by far, the best grapefruit are red/pink (this refers to the INSIDE color; the outside is still yellowy-pink) Texas grapefruit. If you can get them, bypass all other choices. Trust me on this. How to eat: slice in half through its equator. Slice around each section (painstaking work, I'll admit) and spoon out into a little bowl. For older children, let them spoon their own sections out. This really doesn't take that long; I usually cut ours up while toast is toasting or even while the kids are already eating their cereal. My kids like grapefruit plain (as long as it's that sweet Texas grapefruit), but you can always sprinkle a bit of sugar on it to tempt little palates.

Naval Oranges: generally, the best naval oranges for eating out of hand (as opposed to juicing) come from California. We like the giant ones Sam's Club usually has in stock (in 10-pound bags!). But you can find CA oranges in most grocery stores. How to eat: score the skin (not cutting into the flesh) twice around--in perpendicular lines--making an "x" over each end of the orange. The peel will come off easily in four big pieces. If cutting up for young children, split the orange into two halves and cut the sections horizontally across into small pieces. Then, separate the individual sections. This saves you a lot of time over splitting the sections apart and then cutting each section into smaller pieces.

Tangerines: We like tangerines, we really do. But, honestly, these are my last choice in the citrus line-up. They have a wonderfully perfumy flavor that is very different from the rest, but they are a PAIN to deseed for young children.

Clementines: Readily available this time of year (even though they frequently come from Spain), these are the easiest of the group to peel. They are also usually seedless, juicy, and a perfect size for small hands! How to eat: Older children can peel their own! Peel for younger children and split into two halves. Slice horizontally through each half once. Separate sections into individual pieces.

Mandarins: Available at places like Sam's club. These are similar in size to clementines, but a bit harder to peel. They're not quite as juicy, but they have a terrific flavor (my kids love these best). How to eat: Older children can peel their own! Peel for younger children and split into two halves. Slice horizontally through each half once. Separate sections into individual pieces.

Canned Mandarin Oranges: for very young children, this is a perfect option. Citrus fruits can have hard to chew sections, so these canned slices are an excellent choice. They have the same vitamin C and can be found packed in juice instead of syrup (Kroger brand actually).

A word on cost: sometimes, the price of a 5-pound box of clementines looks prohibitive. They go on sale around here frequently for $6/box. If you think about it, that's only $1.20/pound--what you pay for most in season fruit. Berries are always more than that; apples are often, too, unless they're on sale. Even when on sale in most stores, apples rarely drop below $1/pound. So, indulge in that box of easy-to-peel and kid-friendly citrus. Your kids will love them, and you'll have a nice change from the usual apples.

Saturday, November 28, 2009

Turkey Soup

It's time for turkey soup, everyone! Here is our mom's recipe.

  • turkey carcass
  • 2 c. chopped cooked turkey
  • 2 c. sliced fresh mushrooms
  • 1 c. sliced carrots
  • 1 c. sliced or chopped onion
  • 1 c. sliced celery
  • 1 clove minced garlic
  • 1 t. poultry seasoning
  • 2 t. salt
  • 1/2 c. rice or barley
  • 1/2 c. flour
  • 1 1/2 c. (or so) milk
Put turkey carcass, meat, mushrooms, carrots, celery, onion, garlic, seasoning, and salt in large Dutch oven. Pour 2 quarts water over. Bring to a boil, reduce heat, cover, and simmer 1 hour. Remove carcass and pull off any bits of meat from it.

Add meat back to pot along with the rice or barley. Cover and simmer 1 more hour.

Slowly stir 1/2 cup milk into 1/2 cup flour, mixing until smooth. Add to soup, stirring constantly until blended. Add 1 cup milk, more or less, to soup. Bring to a boil and cook until thickened.

Makes 10 cups

Sunday, March 8, 2009

Wassail

Have this ready in your crock pot or simmering on your stovetop at your next cold weather party or gathering. It's wonderful and very "seasonal." Recipe is from my friend Rachel.

  • 1 c. fresh orange juice
  • 4 sticks cinnamon
  • 1 whole allspice
  • 4 cloves
  • 8 1/2 cups apple cider or juice
  • 2 1/8 cups dark rum*
  • 1/4 cup fresh lemon juice*
*May substitute pineapple juice for these two ingredients.

Bring all ingredients to a boil, then quickly turn heat off and let steep for 4 hours. Serve hot (reheat before serving or keep warm in a crock pot turned to "low" setting while steeping).

Makes more than a half gallon

Wednesday, February 4, 2009

Cream of Turkey and Wild Rice Soup

Plan to make this soup with your Thanksgiving turkey leftovers this next fall (or go buy a turkey and make it while it's still nice and wintry!). It's become one of the main reasons we cook a turkey even if we are having one at relatives' houses on the actual holiday. It makes a significant amount, so you can plan for this as a big dinner party sometime during the holidays. I make my turkey broth and cut up some extra turkey pieces the day after I roast the turkey. Then, I freeze the broth and meat until I'm ready to make the soup! It's very similar to the cream of chicken and wild rice soup at places like Panera or Atlanta Bread Company. Mmmmm... 

Cream of Turkey and Wild Rice Soup
Recipe adapted from allrecipes.com
  • 1 leftover turkey carcass plus pan drippings*
  • 3 medium onions, chopped
  • 2 large carrots, diced
  • 2 celery ribs, diced
  • 1 cup butter, cubed
  • 1 cup all-purpose flour
  • 2 cups half-and-half cream or a comparable mixture of heavy cream and whole milk
  • 1 cup uncooked long grain rice**
  • 2 teaspoons salt
  • 1 teaspoon chicken bouillon granules*
  • 3/4 teaspoon pepper
*I roast my turkey with chopped onions, carrots, and celery in the bottom of the roaster. When I make my stock with the carcass, I throw in ALL the pan drippings and bits. If you don't have that option, use the bouillon granules as directed. I don't use/need them.

**I use a wild rice soup blend from a natural foods store--it includes some dehydrated veggies.  
  1. Place turkey carcass in a soup kettle or Dutch oven along with any bits and drippings from the roasting pan and cover with water. Bring to a boil. Reduce heat; cover and simmer for at least 1 hour. Remove carcass; strain and cool broth. You will need at least 3 quarts for the soup. Remove turkey from bones and cut into bite-size pieces; set aside (or freeze if making the soup later). Recommended: make the stock the day before you want to make the soup; store stock in fridge and then scoop out the hardened fat before making the soup.
  2. In a large soup kettle or Dutch oven, sauté the onions, carrots and celery in butter until tender. Reduce heat; stir in flour until blended. Gradually add 1 qt. of reserved broth. Bring to a boil; cook and stir for 2 minutes or until thickened.
  3. Add cream, rice, salt, bouillon, pepper, remaining broth, and reserved turkey. Reduce heat; cover and simmer for 30-35 minutes or until rice is tender.
Serves 16

Wednesday, December 31, 2008

Lentils and Rice with Fried Onions (Mujadarrah)

Mmmmm.... This is a pantry meal that is cheap, healthy, easy, and DELICIOUS. It's sort of vegetarian comfort food. I don't know why it's so good because the ingredient list is so unassuming. This makes a great early meal for older infants; simply pull out a portion before adding the onions or heavily peppering.

Recipe from Vegetarian Cooking for Everyone

6 T. olive oil
1 very large onion, sliced into rounds 1/4-inch thick (or more if you like caramelized onions--they cook down quite a bit)
1 1/4 c. green or brown lentils, sorted and rinsed
salt and freshly milled pepper
3/4 c. white or brown long-grain rice (I always use brown)

Heat the oil in a large skillet over medium heat. Add the onion and cook, stirring frequently, until it's a rich, dark brown, about 12 minutes. Meanwhile, put the lentils in a saucepan with 1 quart water and 1 teaspoon salt (if using brown rice, add now, too, and add some extra water--you can always strain out the excess water at the end). Bring to a boil, then simmer for 15 minutes. Add the rice, if using white, plenty of pepper, and, if needed, additional water to cover. Cover and cook over low heat until the rice is done, about 15 minutes more (brown rice/lentils take about 35-40 minutes total). Stir in half the onions, then cover and let stand off the heat for 5 minutes. Spoon the lentil-rice mixture onto plates or a platter and cover with the remaining onions.

Serves 3-4; can be doubled easily

Friday, December 12, 2008

Famous Chili

This is my husband's adaptation of the red chili recipe featured earlier this week. He likes his chili hot, so this is our spiciest recipe. It's also our "meatiest" and, therefore, the heartiest. It's also good with venison sausage if you happen to have a hunter in the family.

Recipe adapted from Better Homes and Gardens New Cookbook, 11th edition

  • 1/2-1 pound ground turkey*
  • 1/2 pound of hot Italian sausage, pushed out of casings (or more)*
  • 1 c. chopped onion (1 large)
  • 1/2 c. chopped sweet green pepper
  • 2 cloves garlic, minced
  • 1 (14.5-oz.) can tomatoes, cup up (undrained)
  • 1 regular can of Ro-tel tomatoes, undrained (go with the hot if your sinuses need some clearing up)
  • 1 (15-oz.) can pinto beans, rinsed and drained
  • 1 (8-oz.) can tomato sauce
  • 2-3 t. chili powder
  • 1/2 t. dried basil
  • 1/4 t. pepper
*You should have roughly 1 to 1 1/2 pounds of meat, more or less, depending on how much of each type you use.

In a large saucepan, cook ground meat, onion, sweet pepper, and garlic till meat is brown and onion is tender. Drain fat. Stir in remaining ingredients. Bring to boiling; reduce heat. Cover and simmer for 20 minutes. Makes a lot, but freezes great. Taste and adjust the seasonings if necessary (depends on how seasoned your sausage is).